Alchatek

Contractor Training Portal

Access the full Alchatek contractor training library.

← All Modules Alchatek ☐ In Progress
Module 08 · Track 3 — Equipment

Titan Impact 440
Pump

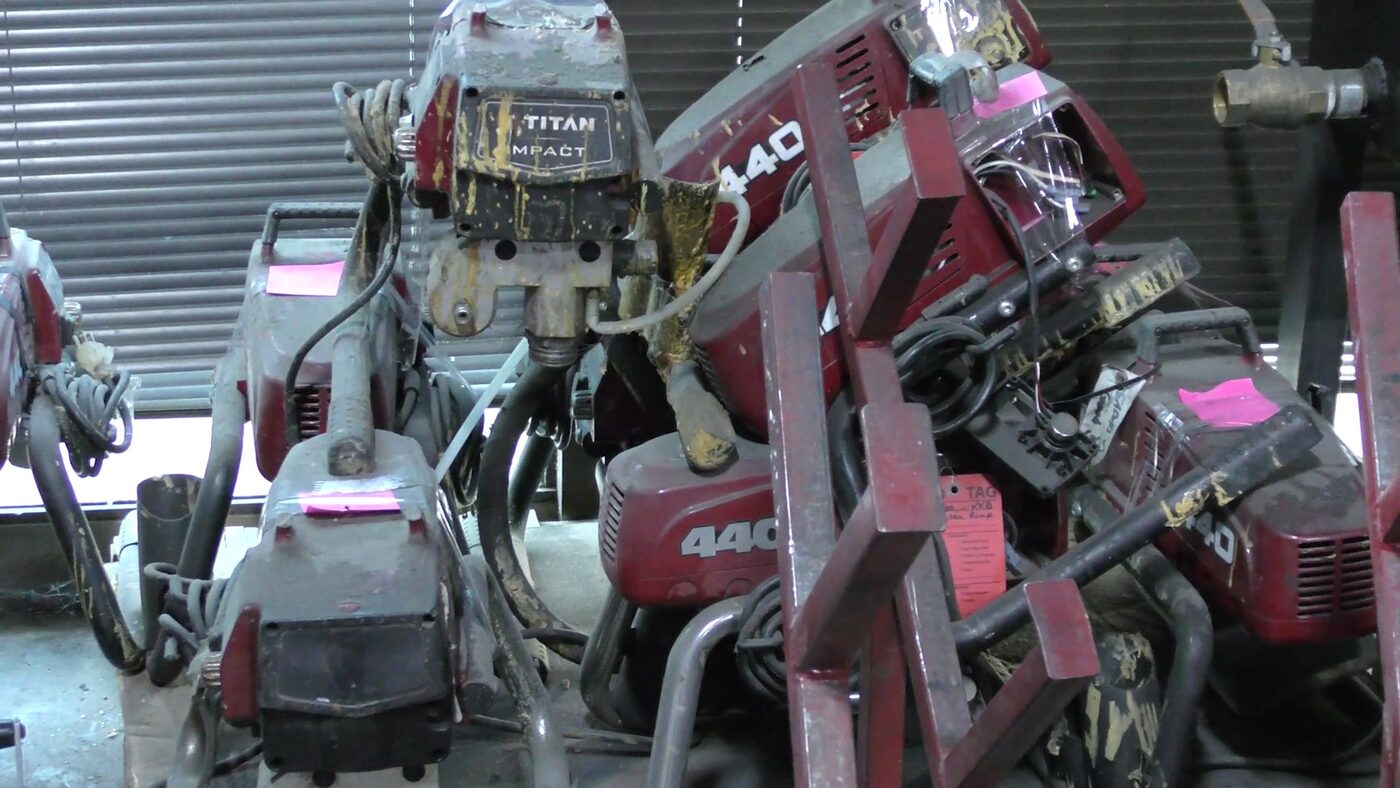
The workhorse pump for single-component injection — three controls, one hard pressure rule, and a ten-minute flush ritual. The photo behind this title is the "boneyard": a pile of dead pumps with nothing wrong with them except that nobody flushed them.

8 LessonsOperation + FlushingEquipment TrackFull Course

After this module, you'll be able to run the Titan 440 with correct pressure discipline, prime it without contaminating your flush, free a stuck check ball, execute the full two-stage flush, and store the pump so it never ends up in a boneyard of your own.

Key Takeaways

Three controls run the whole machine: power switch, pressure dial, priming lever. Master those and you've mastered the pump.
Always start at the lowest pressure — dial full counterclockwise BEFORE power-on, then climb only as the job demands.
Above ~2,500 PSI you risk shearing concrete. The pump goes higher; the concrete often can't. Patience beats pressure.
The priming hose is a last resort with urethane — if you use it, it must be flushed too, into a waste bucket first.
Flush twice, five minutes each. Used flush first, fresh flush second — ten total minutes that keep the pump alive.
Store with Pump Saver, not flush. Flush sitting in the system long-term is how pumps end up in the boneyard.
Lesson 1

Meet the 440

The Titan Impact 440 is an airless pump — designed and sold as a paint pump — that the polyurethane trade adopted as its standard crack-injection and single-component workhorse. It comes in skid and stand versions; the skid is what Alchatek stocks.

One modification before it ever pumps resin: the filter element comes out of the filter housing. Foam catches in the filter, it's miserable to flush, and for injection work it isn't necessary. (Newer units from Alchatek come this way.)

And an honest note on sourcing: any airless pump that delivers equivalent volume and pressure will do this work — Graco units at big-box stores included, often cheaper because paint retailers buy them by the truckload. What matters is the volume, the pressure, and above all the maintenance discipline in Lesson 7 — that's what kills these pumps, not the brand on the cowl.

Titan Impact 440 skid pump with injection gun
The 440, skid version — with the injection gun and whip on the bench.
Lesson 2

Three Controls — And the Order That Matters

  1. Pressure dial all the way down FIRST — full counterclockwise, before the power ever comes on. That's the lowest pressure setting.
  2. Power on. Nothing should happen yet — that's correct. With the dial at minimum, the pump idles.
  3. Climb the pressure only as needed. Injecting crack packers, you'll nudge the dial up at one packer, then turn it back DOWN before moving to the next — turning down also relieves the pressure in the line.

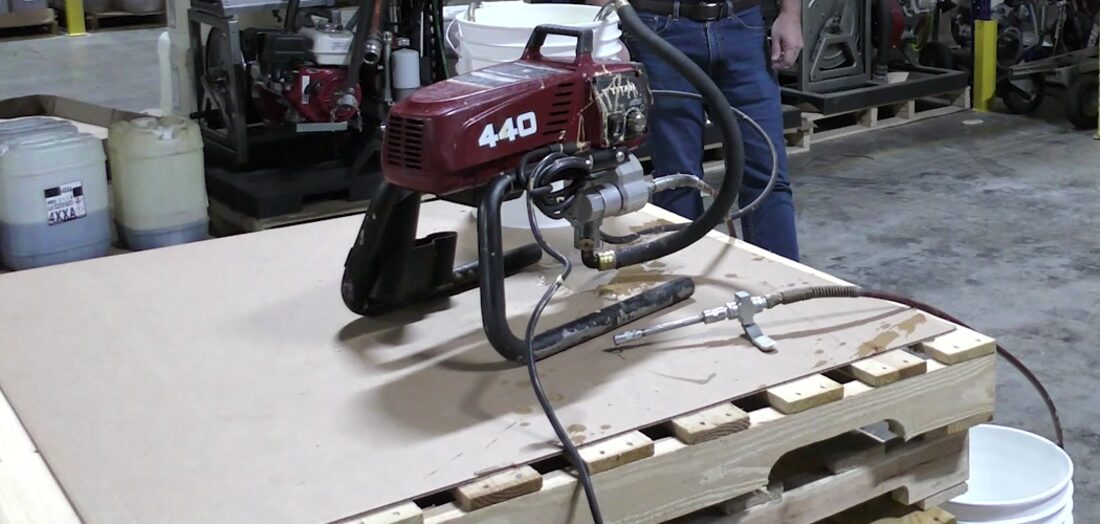
"Every time you use these pumps, you always want to start at the lowest pressure and then just turn up as necessary."— Alchatek Technical Training

Two reasons the rule is absolute: too much pressure too fast can shear the concrete you're repairing (Lesson 3), and lower pressure means lower risk of the airless injection injuries covered in the Safety module — a high-pressure stream pierces skin, and that's a medical emergency, not a cut.

Lesson 3

Specs & the 2,500 PSI Rule

0.54 GPMFlow Rate
~3,250 PSIMax (check your plate)
2,500 PSIConcrete Risk Line
50 ftHose Included

Just over half a gallon a minute, with max pressure up around 3,250 PSI (verify the rating plate on your own unit). You will rarely need the top end — and the trainer's experience says you shouldn't go looking for it:

"When you crank it up above twenty-five hundred, you're risking shearing the concrete... I've done it many times because I'm not patient. The idea is to be patient with it."— Alchatek Technical Training

Shearing means exactly what it sounds like: enough hydraulic pressure inside a crack that the concrete itself breaks. The product needs time to travel; the dial is not a throttle for your schedule.

Same pump, second job: this identical pump lives on the rig as the MixMaster water-flush pump — it delivers exactly the right volume and pressure to clean the gun and mix chamber.
Lesson 4

The Priming Hose — Use It Reluctantly

On the side of the pump is the priming lever and its short bypass hose. Its job: when the pump is full of air, it struggles to pull fluid 50 feet to the gun — the priming hose gives the fluid a short path so the pump can establish draw, then you switch over to the main hose.

"I don't recommend that you use this unless you have to. And I promise you, there will be times when you have to."— Alchatek Technical Training

Why the reluctance, with urethane in the system:

If you used it, flush it. Before any flush, ask: did the priming hose see urethane today? If yes, it gets flushed too — output into a waste bucket until it runs clean, and only then back into recirculation.
Lesson 5

The Check Ball & the Bump Button

Inside the pump's foot is a check ball — the one-way valve that lets the pump draw fluid up and not push it back. It can stick: cured resin around it, or even paint fillers in the pump's original line of work.

Newer 440s have a bump button on the foot — press it and it mechanically knocks the check ball loose. Before that feature existed, the field fix was beating the pump foot with a wrench until the ball let go. The button is kinder to the pump and to your wrench.

Symptom to remember: pump runs but won't draw fluid, and priming doesn't fix it — think stuck check ball before you think dead pump. One button-press costs nothing.
Lesson 6

Hoses & Reach

Lesson 7

The Two-Stage Flush — Ten Minutes That Save the Pump

This is the lesson the whole module exists for. Pressure down, pressure relieved, then:

  1. Recover your resin first. Drain the material from the hose back toward the resin pail — the product is expensive and reusable if you keep it clean. The trick: lift the intake out of the fluid for a second to pull an air gap, then drop it into the flush. That gap is your marker.
  2. Watch for the transition. Resin runs darker; then comes the air gap (a spit), then flush. The moment the color shifts, swing to a waste bucket and shoot a cup's worth — if it's a resin/flush mix, trash that little bit rather than contaminate either pail.
  3. Stage 1 — used flush: ~2.5 gallons of flush from your last job. Once clean flush is flowing, recirculate hose-to-bucket for 5 minutes.
  4. Stage 2 — fresh flush: set the used flush aside, ~2.5 gallons of new flush, same procedure, 5 more minutes of recirculation.

"Do it twice, and do it for five minutes each. You do that, you're never going to have problems."— Alchatek Technical Training

Secure the hose in the bucket while it recirculates — you'll be cleaning up other gear, and one kicked hose sprays solvent across the whole work area.
Flush setup: Titan pump, flush bucket and recirculating hose
Flush in progress. Intake in the flush bucket, return hose secured — then five patient minutes, twice.
The boneyard: pile of failed Titan 440 pumps
The boneyard. Motors fine, frames fine — every pump here died of an unflushed fluid section.
Lesson 8

Storage & the Boneyard

After the second flush stage, where the job goes next decides what stays in the pump:

  • Back on the same job tomorrow? Flush in the system overnight is acceptable.
  • Wrapping the job? Replace the flush with hydraulic fluid — or better, Pump Saver — and store it that way. Flush sitting in the fluid section for weeks attacks the system; the oil protects it.

And the reason to take all of it seriously sits in a pile at the training facility:

"Not a damn thing wrong with any of these pumps, except they didn't get flushed properly."— Alchatek Technical Training

Every pump in the boneyard has a working motor. The clogged fluid section costs roughly 75% of a new pump to repair — an economic write-off. One more piece of history worth knowing: Alchatek's pump flush was reformulated years ago with ISO neutralizers after a bad stretch of failures, and complaints stopped. Use the current flush, follow the two-stage procedure, and your 440 stays out of the pile.

Vocabulary

Titan Impact 440
Airless paint pump adopted as the standard single-component injection pump; skid or stand versions.
Airless Pump
Pumps fluid at high pressure without air assist — the stream itself can pierce skin.
Priming Lever / Hose
Short bypass path that helps the pump establish draw — flush it if it sees urethane.
Check Ball
One-way valve in the pump foot; sticks with cured resin.
Bump Button
The button that knocks a stuck check ball loose — the wrench retirement program.
Shearing
Concrete breaking from excessive injection pressure — the risk above ~2,500 PSI.
Pump Flush
Alchatek's cleaning solvent, formulated with ISO neutralizers.
ISO Neutralizers
Flush additives that neutralize isocyanate residue — the reformulation that ended a year of pump failures.
Pump Saver
Storage fluid that replaces flush when a job wraps — protects seals and packings long-term.
Two-Stage Flush
Used flush 5 minutes, fresh flush 5 minutes — the ten-minute ritual.
Air Gap Trick
Briefly lifting the intake between resin and flush — the audible/visible marker of the transition.
Boneyard
The pile of unflushed pumps kept as the training facility's cautionary monument.

Knowledge Check

Score at least 4 of 5 to unlock module completion.

Q1. Before you turn the 440's power on, what's the state of the pressure dial?
Set to the pressure the job needs, so you're ready to inject
Halfway — a safe middle ground
Full counterclockwise — lowest pressure, every time, then climb only as needed
Q2. The pump is rated past 3,000 PSI. Why hold it under ~2,500 on injection work?
The motor overheats above 2,500
Above ~2,500 PSI you risk shearing the concrete you're repairing — pressure can't replace patience
Hoses are only rated to 2,500 PSI
Q3. You had to use the priming hose with urethane today. What does that change at flush time?
The priming circuit must be flushed too — draining into a waste bucket first so it doesn't contaminate the fresh flush
Nothing — the priming hose self-cleans during normal flushing
Skip flushing entirely and go straight to Pump Saver
Q4. Describe the full flush procedure.
One pass of fresh flush until the output runs clear
Rinse with water, then a quick solvent pass
Two stages: recover resin, then used flush recirculating 5 minutes, then fresh flush recirculating 5 more — ten minutes total
Q5. The job is wrapped and the pump goes into storage. What's in the fluid section?
Fresh flush — it's a cleaning solvent, so it keeps the pump clean
Hydraulic fluid or Pump Saver — flush left in long-term damages the system
Nothing — drain it bone dry
Saved — your progress is updated on the Training Hub.
← Void Filling The Gun →