Alchatek

Contractor Training Portal

Access the full Alchatek contractor training library.

← All Modules Alchatek ☐ In Progress
Module 12 · Track 3 — Equipment

PolyBadger
Masterclass

The complete course on Alchatek's portable, low-pressure foam injection machine — cabinet systems, the auto calibrator, daily and weekly maintenance, startup, gun technique, troubleshooting triage, and knowing exactly where the Badger's limits are. Combines the Equipment Masterclass and the Maintenance & Troubleshooting walkthrough into one course, taught by Colt, Alchatek Technical Training.

11 LessonsPlural-ComponentLow-Pressure / PortableMasterclass + Maintenance Combined

After this module, you'll be able to set up, start, run, and shut down a PolyBadger; perform the daily and weekly maintenance that keeps it out of the shop; triage the "it won't pump" call in the right order; and set honest customer expectations about what this machine can and can't do.

Key Takeaways

Y-strainers are the #1 maintenance item. Check them weekly, period — 90% of "PolyBadger won't pump" calls are a clogged A-side strainer.
The auto calibrator enforces a perfect 1:1 ratio — if either material stops flowing, the whole machine stops. That's a feature; learn to read it.
Neglect is what kills these machines. The Auto Lube upgrade exists because people don't flush — it cycles lube automatically, 60 seconds every 10 minutes.
Know the limits: ~6.2 lbs/min vs 28 on the rig; 50–60 ft of hose is the real-world max; 1,000 lbs of foam is a full 12-hour day.
Gun discipline: the metal MiniMaster replaces the old disposable gun — clean and reuse it, keep the air line clear (never black), lube the front end, and never lean on the plastic tip.
For concrete lifting, flow stays on HIGH. Low flow is for insulation — flipping a "weak" machine from low to high triples the output.
Lesson 1

Meet the PolyBadger

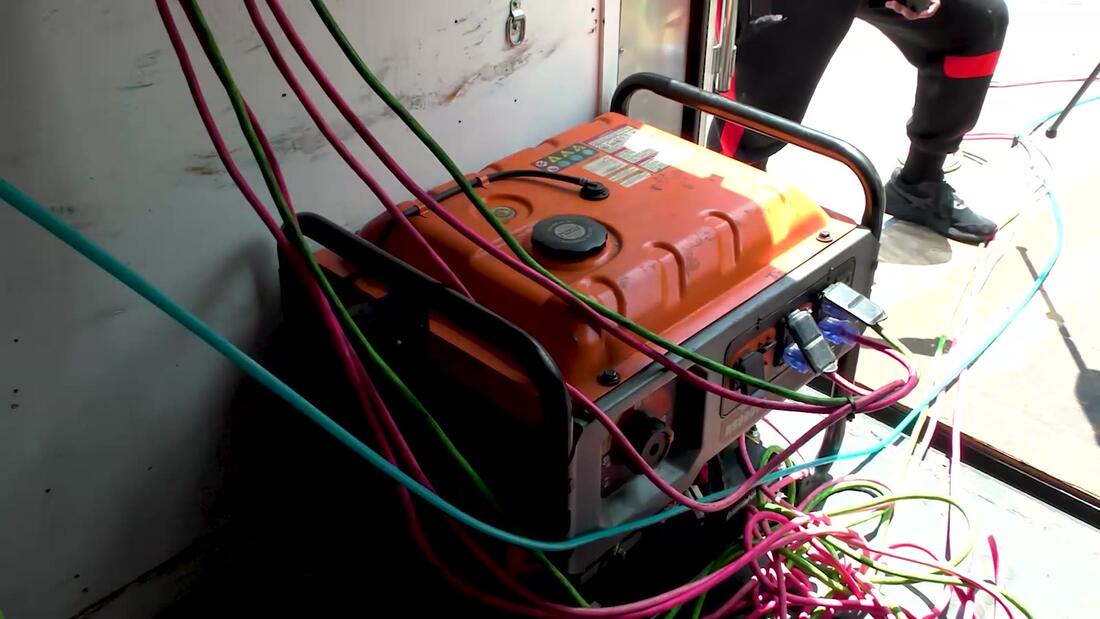
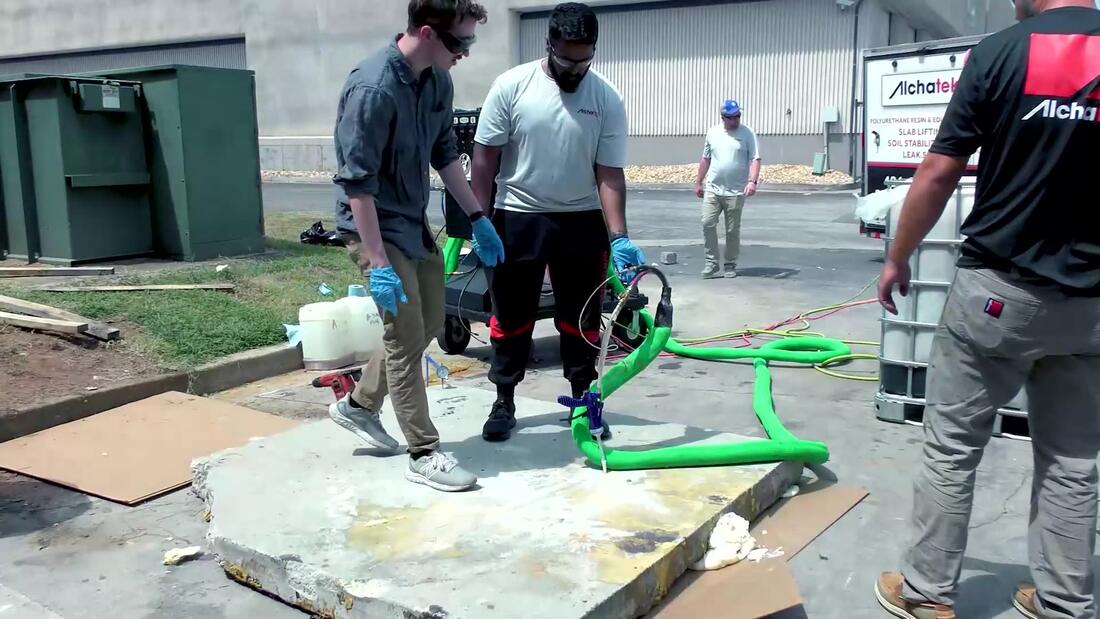
The PolyBadger is Alchatek's portable, low-pressure plural-component proportioner for slab lifting and void filling. Its entire reason for existing is the word portable: it rolls on cart wheels, runs quiet, and goes places a rig can't. Wheel it through a middle school hallway, run an extension cord, and you're a self-contained injection operation. One contractor ran Amazon Fulfillment center work more than 400 feet from the truck — a job physically impossible with a trailer rig.

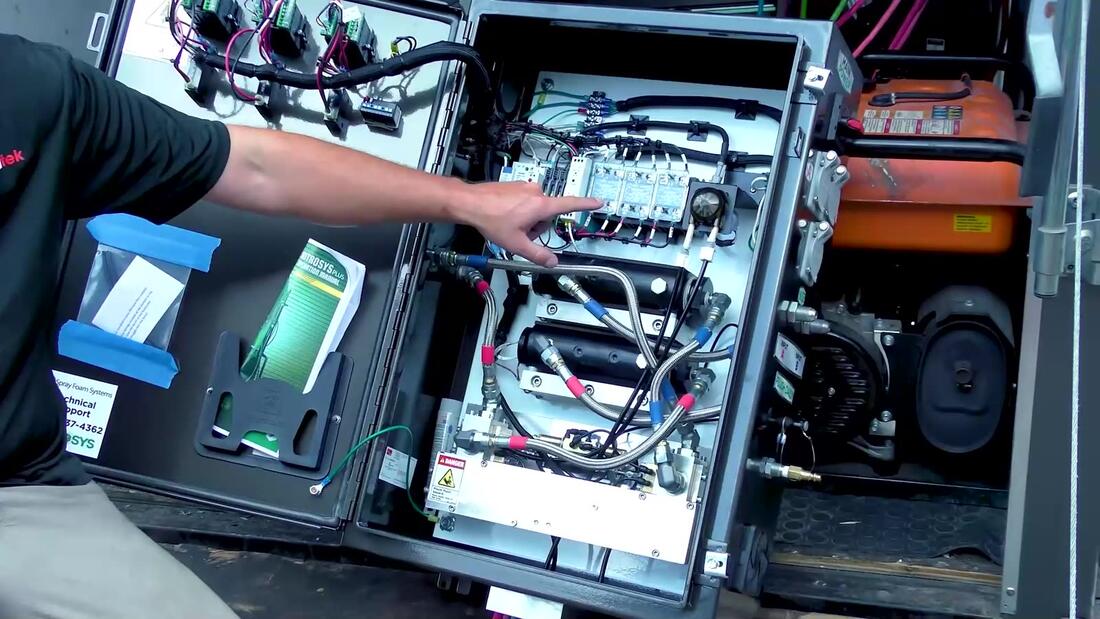
The common field setup is an enclosed trailer with a winch to load the machine in and out, a compressor, and a generator. Power matters: the generator carries two 220V circuits — A and B heaters share one circuit, and hose heat takes the second (hose heat draws as much as the other two heaters combined). Set the air regulator to 120 PSI per the User Manual.

On the machine itself: a 50-foot fully heated hose, two stubby 2:1 stick pumps feeding the cabinet, and the injection gun. No high-pressure hose anywhere — this is the low-pressure side of the equipment family.

Generator and hoses in PolyBadger trailer
The enclosed-trailer setup. Compressor and generator mounted in the trailer, winch for loading — self-contained and ready to roll to the job.
Lesson 2

Capabilities & Limitations — Sell It Honestly

The PolyBadger is the right machine when portability wins. It is the wrong machine for production work, and the fastest way to a miserable customer is letting them find that out on a job. Lead with the good, then set the limits clearly:

6.2 lbs/minBadger, gun wide open
28 lbs/minhigh-pressure rig
50–60 ftreal-world hose limit
1,000 lbs= a full 12-hour day
"It'll go a pretty long way — as long as you're using it within its limits."— Colt, Alchatek Technical Training
Lesson 3

Inside the Cabinet

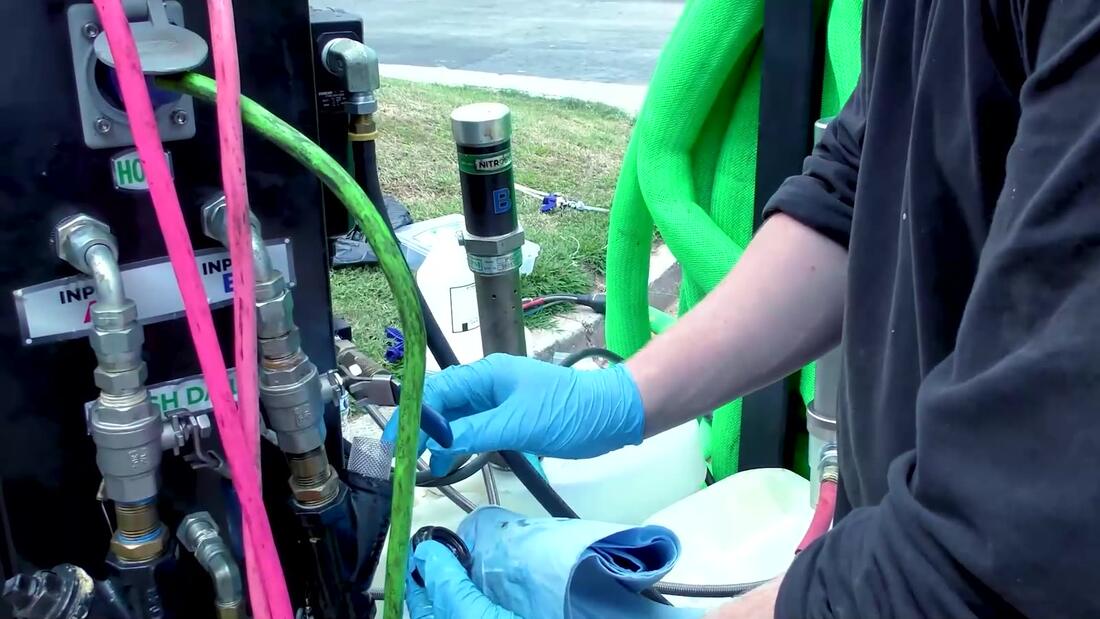
Material path, start to finish: stick pumps → braided-steel feed lines → Y-strainers → heaters → auto calibrator → heated hose → gun. The stubby stick pumps are 2:1 air-driven transfer pumps (roughly 100 PSI max working) — and here's the key systems insight: whatever fluid pressure the stick pumps make is all the pressure the whole system has. There is no second-stage pump.

That tempts people into a classic mistake: cranking air pressure to chase production. On the old cabinets, pushing past ~150 PSI snapped the calibrator piston almost instantly — Colt broke one himself at World of Concrete trying to make it pump faster. The new cabinets have internals nearly double the size and tolerate more abuse, but the rule stands: run it at spec, not at "more."

Heat: A-side and B-side heaters with internal heating rods, plus the heated hose, each on its own controller — targets around 100–110°F, adjusted with the panel arrows.

Stick pump connections
Stick pump connections. 2:1 stubby transfer pumps — the system's only source of fluid pressure.
Cabinet relays and wiring
Controller relays and fuse blocks. The manual says check fuse blocks weekly — controllers, cycle counter, and fan.
Inside the PolyBadger cabinet
Inside the cabinet. The auto calibrator is the most failure-prone component on the machine — and the most common cause of downtime.
Lesson 4

The Auto Calibrator

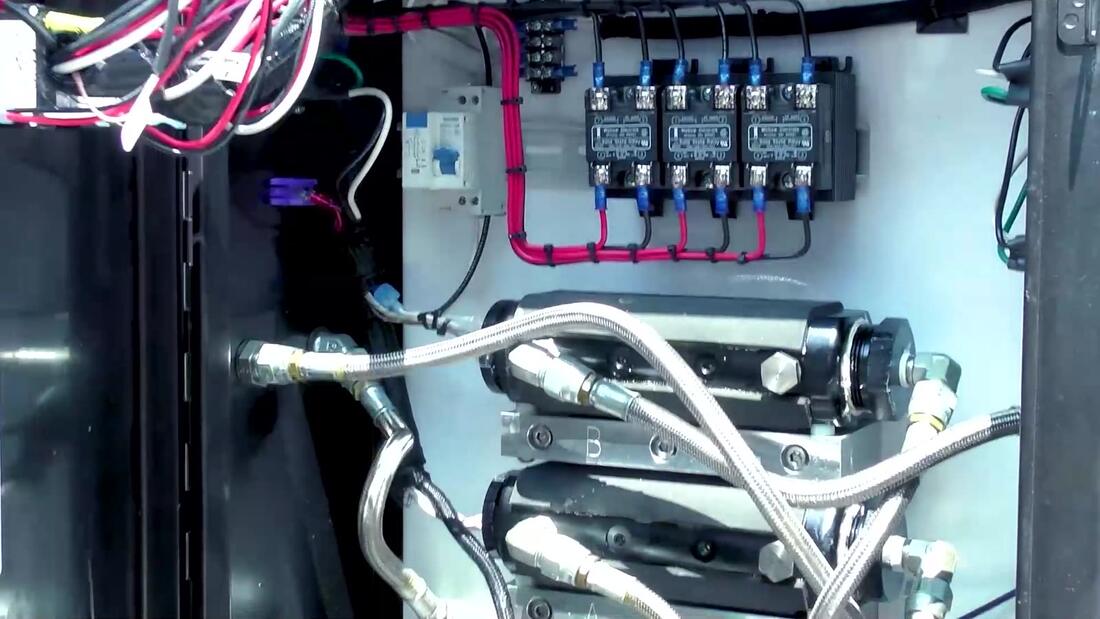
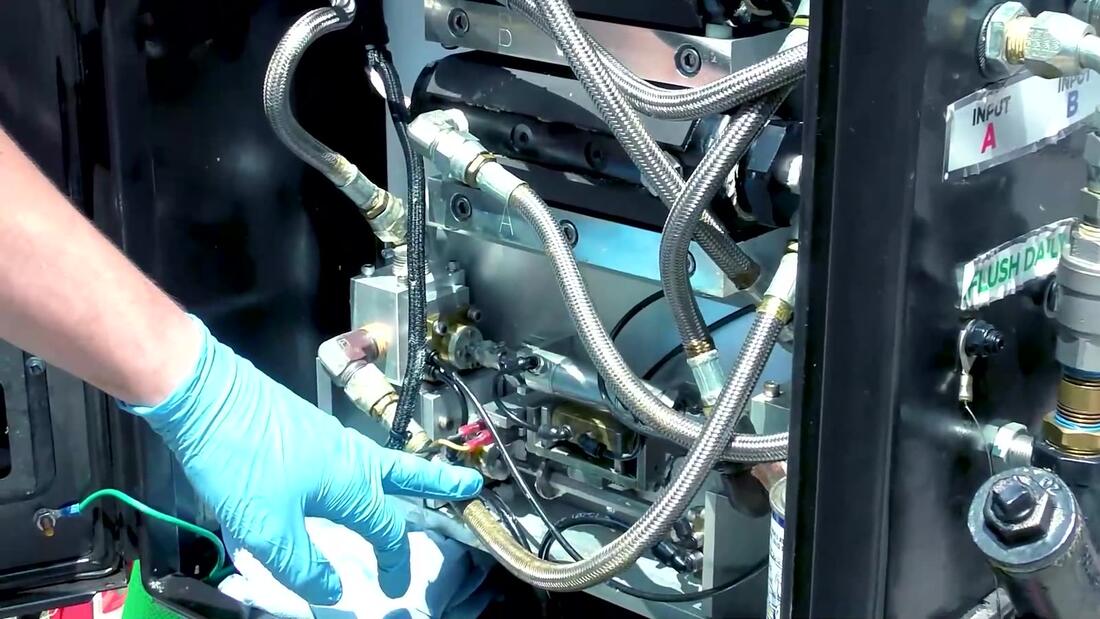
The auto calibrator is the component that makes a low-pressure machine produce properly mixed foam: it enforces a perfect 1:1 ratio of A-side (ISO) and B-side (resin). If either material stops flowing — clogged strainer, closed valve, dead heater — the calibrator stops the whole machine rather than spray off-ratio foam. Every "it won't pump" complaint starts here conceptually: something is starving one side.

Failure modes to know: ISO crystallization seizing it up, units coming out of time, and the small roll pin that can break or disconnect — the unit strokes but pumps nothing because the ISO side isn't being pulled. Watch for a machine that cycles but produces no material.

Stock a spare. Auto calibrators are sold separately, and a failed unit goes to Spray Foam Systems for rebuild — typically a 2–3 week turnaround. With a spare on the shelf you keep working; without one you lose two weeks of jobs. Order the spare when you order the machine.
Lesson 5

The Auto Lube Upgrade

On the old cabinets, the auto calibrator survived only if the operator manually flushed lube through it daily — and in the real world, nobody does. Stagnant ISO crystallizes inside the calibrator, and the machine dies. That neglect pattern generated more service calls than any other cause.

The Auto Lube system takes the human out of the loop: a lube canister hangs under the cabinet plate, and a timed pump cycles lube through the A-side automatically — 60 seconds every 10 minutes, continuously replacing the lube so ISO never sits still long enough to crystallize. All new PolyBadgers ship with it.

Retrofit check for older machines: the upgrade only works if the old manual lube circuit isn't already seized. Squeeze a lube bottle into the lube ports — if lube comes out the bottom, the path is clear and the Auto Lube kit can go on. If not, the calibrator needs service first.
"What neglect does is what kills these machines. People just don't flush them. So this does it automatically — we take neglect out of the equation."— Colt, Alchatek Technical Training
New cabinet with Auto Lube system
The new-style cabinet. Auto Lube hardware mounted with the lube canister below — 60 seconds of circulation every 10 minutes, automatically.
Y-strainer removal with brake cleaner
Y-strainer service. Relieve pressure, pull the screen, dissolve ISO crystallization with brake cleaner, white lithium grease on the threads going back together.
Lesson 6

The Weekly Maintenance Routine

"90% of the time, the A-side is completely clogged up because nobody checks them. So that's always the starting point."— Colt, Alchatek Technical Training
  1. Y-strainers — weekly, period. Relieve pressure, remove, clean the screen (brake cleaner dissolves ISO crystallization), white lithium grease on the threads, reinstall.
  2. Desiccant pill — replace weekly. It only lasts a week; a three-month-old pill means crystallization through the whole system: strainers, heaters, calibrator.
  3. Grease in the cabinet — replace weekly (per the User Manual): remove residual, fresh grease in.
  4. Fuse blocks — check weekly: each controller, plus the cycle counter/fan.
  5. Old-style cabinets only: grease the auto-calibrator rods every morning the machine runs — a dab on each rod — and flush the cabinet at end of day (flush pot, 4 seconds per side).
  6. Every drum change: grease the bung adapter and collar, check the Y-strainer, rinse the screen with solvent — and store transfer pumps fully submerged in Alchatek resin.

Most contractors run a Badger once or twice a week, not daily — which makes the weekly ritual even more important. An intermittent machine is exactly the one ISO loves to set up in.

Lesson 7

Startup & Warmup

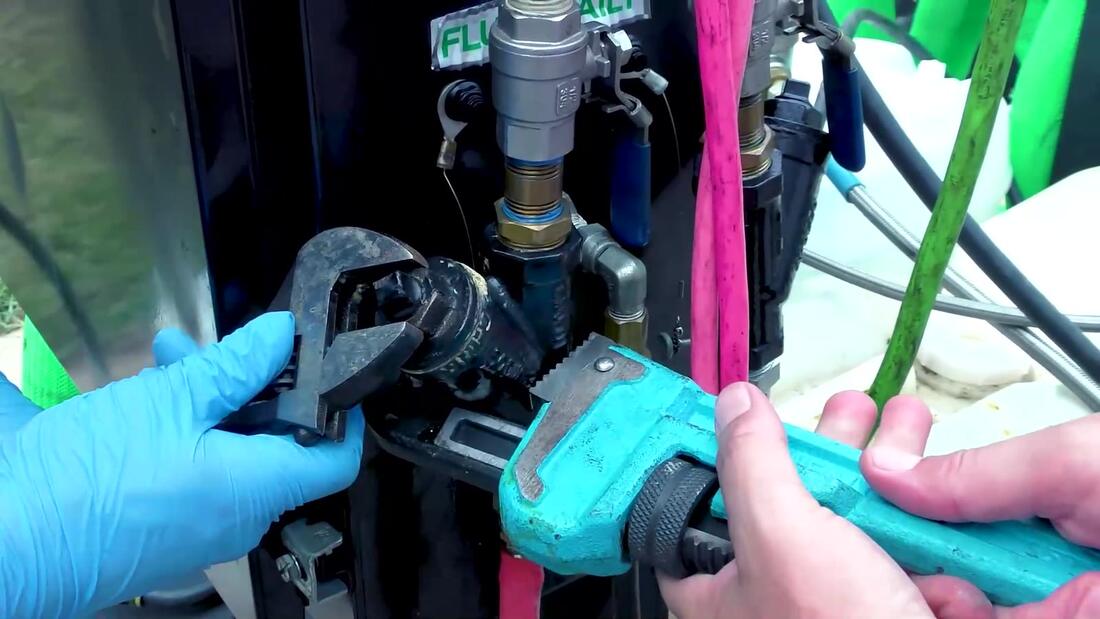
First startup on a new machine (per the User Manual): the system ships full of hydraulic fluid from factory testing. Drain the stick pumps (push up the check valve at the bottom), set the regulator to 120 PSI, run the return lines into trash pails, and cycle until you see the color change from hydraulic fluid to material — first through the returns, then through the hoses. Expect the first foam out of a fresh rig to be off-color until residue clears — budget an extra set of material for a fresh rig's first job so the flush doesn't eat your margin.

Daily startup:

  1. Connect power cords and air; start the generator. Regulator at 120 PSI; stick pump air valves off; input valves closed.
  2. Set heater temperatures — A, B, and hose, around 100–110°F on the panel controllers (arrow keys adjust).
  3. Power the stick pumps, open the supply valves.
  4. Flip to recirculate mode: material flows from the stick pumps through the heaters and calibrator and back to the barrels, warming the whole batch.
  5. Wait 15–30 minutes depending on ambient temperature. Hot day with material baking in the sun? It may already be there.
  6. Flip the valves to gun mode when ready to spray.
Watch the 1:1 enforcement work: close one supply valve during recirculation and the entire system stops. That's the auto calibrator protecting the ratio — and your first diagnostic tool.
Lesson 8

Gun Prep — The MiniMaster

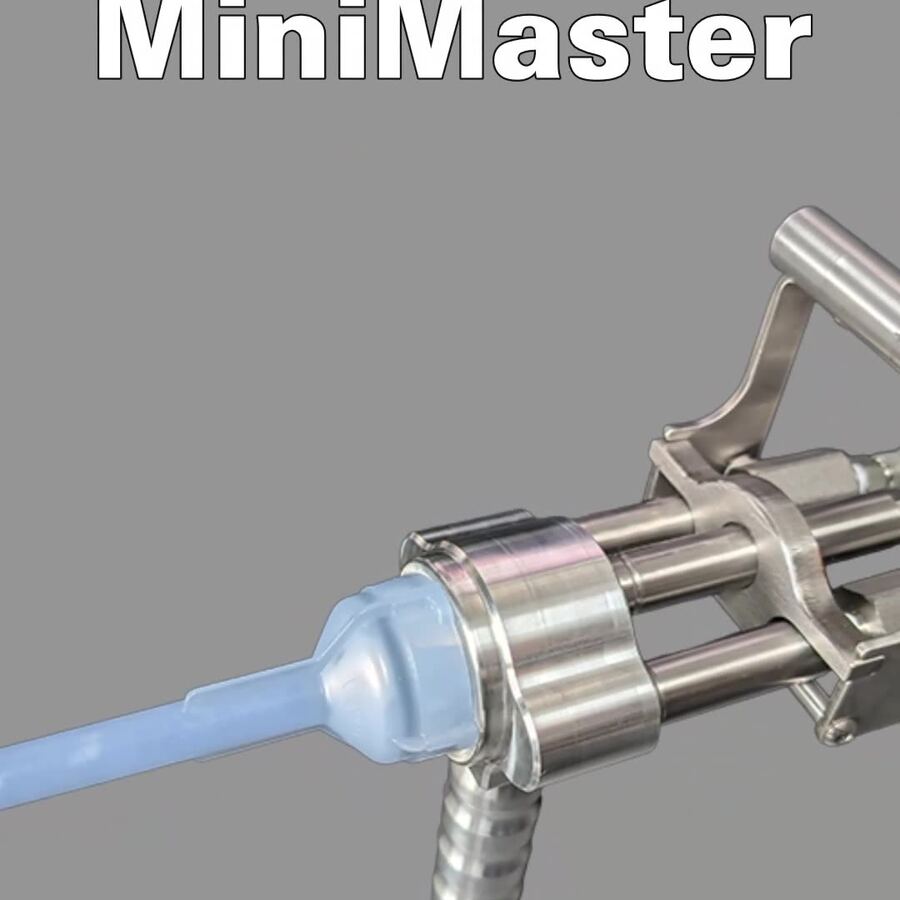
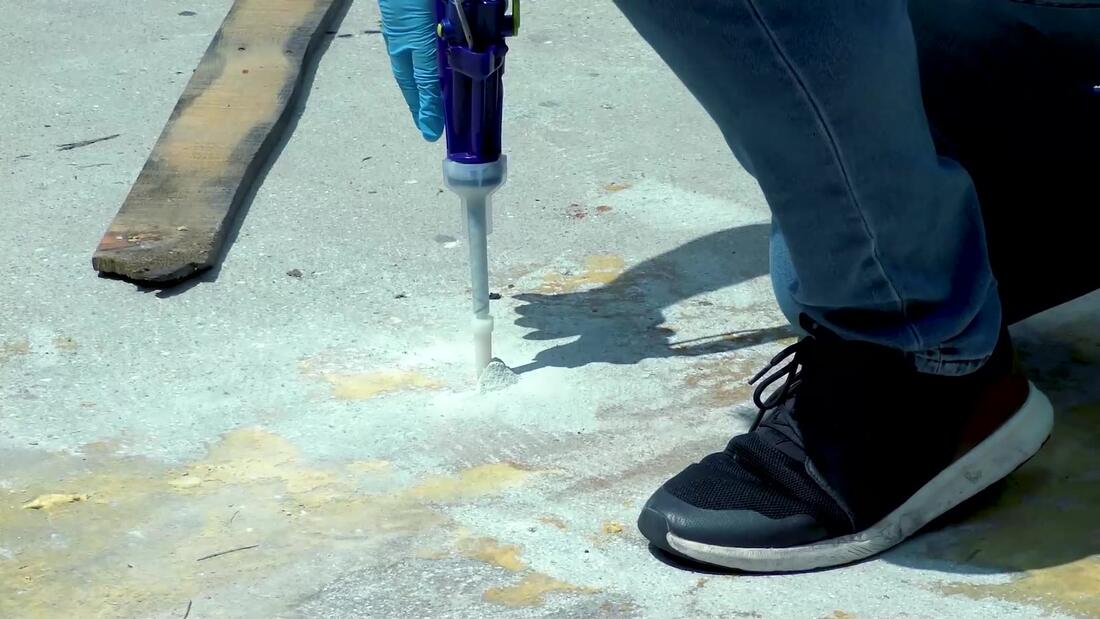
The PolyBadger now runs the MiniMaster Low-Pressure Gun (item PB2010) — a metal-bodied, cleanable, reusable injection gun built specifically for this machine, with a safety lock that prevents accidental discharge and compatibility with the same standard static mixers you already stock.

Old gun, retired. The MiniMaster replaces the previous disposable plastic gun — the ~$200 unit that realistically lasted a week or two on lifting work. Instead of buying guns by the case, you clean and reuse the MiniMaster; only the static mixers and tips remain consumables. If you're still running a legacy plastic gun, the prep and care below applies doubly.

Prep discipline, every time:

  1. Attach the air hose to the rear fitting — the air purge is what keeps material from setting up in the static mixer. Swivel fittings make it replaceable.
  2. Install the static mixer — the disposable element that gives you perfectly blended foam.
  3. Screw on the lifting tip.
  4. Lube the inside of the gun cavity before use, every time.
  5. Seat the airline with the quarter-turn lock — firm pressure, quarter turn, it locks in place.
Ditch the black air hose on day one. Replace it with clear tubing and leave yourself extra length taped up out of the way. With clear hose you can SEE foam blow back up the airline the moment a hole goes dead — let off, pull, clear the gun, keep working. With black hose, the first sign is a dead gun. And when you seat that airline, put a drop of super glue on the connection — it sounds janky, it works.

Gun cleaning (per the User Manual): remove the front plug, drill out the fluid and air orifices, soak the plug in solvent, wire-brush residual foam off the front, and lubricate the entire front end before reassembly. The MiniMaster's metal body is built for exactly this clean-and-reuse cycle.

MiniMaster Low-Pressure Gun
The MiniMaster Low-Pressure Gun (PB2010). Metal construction, safety lock, standard static-mixer compatibility — cleanable and reusable, replacing the old disposable gun.
Lesson 9

Injection Technique — Slab Lifting

  1. Insert the gun tip into the drilled hole — gently. Quarter turn to seat it.
  2. Push down the safety detent, then trigger.
  3. Driveway-scale lift: a 15–20 second opening shot, then read the slab. No containment (open edges, no soil)? Use short 5-second shots instead.
  4. Fluctuate the air as you inject — never just full bore. Modulating air controls how far material spreads and cuts off escapes at slab edges and joints.
  5. Watch for movement and let the slab tell you the pace — don't get ahead of yourself between shots.
  • Air stays around 60% as your working baseline.
  • Flow switch stays on HIGH for concrete lifting. Low flow exists for insulation work. "The machine's weak" calls are usually a flow switch on low — flipping it up triples output.
  • The static mixer and lifting tip are plastic even on the metal-bodied MiniMaster (and legacy guns are plastic throughout). Never lean your body weight on the gun — the mixer or tip will snap.
Gun injecting into slab
On the slab. Tip seated in the drilled hole, short controlled shots, eyes on slab movement.
Hands-on practice on test slabs
Hands-on practice. Every trainee runs the full sequence — gun prep through lift — under supervision.
Lesson 10

Troubleshooting Triage — In This Order

When the call comes in — "my PolyBadger won't pump" — work the list in order. The machine only stops for a reason, and the reason is almost always cheap:

  1. Y-strainers. 90% of the time it's the A-side, completely clogged. (Helping a crew diagnose by phone? Have them text a photo of the auto calibrator and strainers first.)
  2. Valves. Are the whips/hose valves actually open? Machines that "pump great out of the return but nothing out of the hose" usually have closed hose valves. Also check the three-way valve handles — they get removed and reinstalled in the wrong orientation, so "recirculate" is really "gun" and vice versa.
  3. Pull the return lines into a bucket — verify both materials are actually flowing. No A-side flow = no pumping, by design.
  4. ISO-clogged check valves on intermittently used machines — they stick open or closed when ISO sets up inside.
  5. Heaters and hose heat. If hose temperature won't come up, check the heated-hose power connector (the purple cable) — connections work loose and the FTS sensor wiring frays in the field.
  6. Auto calibrator last — stroking without pumping points to the roll pin; seized or out-of-time means the rebuild path (Lesson 4).
Inspect hoses on every field visit. Field hoses take abuse — exposed FTS wiring, pulled connectors, and resin buildup are the norm, not the exception. A heated hose with damaged wiring is a failed hose; don't nurse it.
Lesson 11

Shutdown, Flushing & Storage

End-of-day shutdown (per the User Manual):

  1. Shut down the gun.
  2. Disconnect the A-side and B-side transfer pumps.
  3. Put the hose into recirculation position to depressurize it.
  4. Shut the supply-side valves.
  5. Heat zones off, then main disconnect off.
  6. Flush the A-side and B-side ports: push the collar down, pull the plug, flush, replace both plugs.

Old-style cabinets: flush the cabinet at end of every running day — flush pot, about 4 seconds per side.

Long-term storage = anything over one week of non-use. Swap the resin pails for pails of AP Flush 121, open all valves, and flush the entire system until what exits is 100% clear. Then kill air and power. A Badger parked for a month with material in it is a rebuild waiting to happen.

Deep service note: the stubby transfer pumps disassemble with a strap wrench — lower seals are an annual replacement item, and ISO buildup inside the center tube can be scraped with PVC pipe or dissolved with Soak 130. The check ball at the bottom of the lower housing is the foot valve; keep it clean.

Vocabulary

PolyBadger
Alchatek's portable, low-pressure plural-component foam injection machine for slab lifting and void fill.
Auto Calibrator
Enforces a perfect 1:1 A:B ratio — stops the machine entirely if either side quits flowing.
Y-Strainer
Inline screen on each material line. Weekly check; the A-side clogs first and most.
Stick Pumps
2:1 air-driven stubby transfer pumps — the system's only source of fluid pressure.
Auto Lube
Timed lube circulation (60 sec / 10 min) through the calibrator's A-side; standard on new cabinets, retrofittable if the old lube path isn't seized.
MiniMaster (PB2010)
Metal, reusable low-pressure gun with safety lock — the PolyBadger's current gun, replacing the disposable plastic unit.
Static Mixer
Disposable mixing element on the gun that blends A and B into finished foam.
Lifting Tip
Screw-on plastic nozzle inserted into the drilled hole — flexes, and breaks if you lean on it.
Desiccant Pill
Moisture filter on the material supply. Lasts ONE week — moisture is what crystallizes ISO.
ISO (A-Side)
Isocyanate component; crystallizes with moisture or stagnation — the root cause behind most failures.
Recirculate Mode
Valve position looping material through the cabinet and back to the barrels for warmup.
Roll Pin
Small calibrator pin — when it breaks, the unit strokes without pumping.
AP Flush 121
Flush fluid used for long-term storage — flush until 100% clear.

Knowledge Check

Score at least 4 of 5 to unlock module completion.

Q1. Your PolyBadger won't pump. What do you check first?
The Y-strainers — 90% of the time the A-side is completely clogged
The generator fuel level
Send the auto calibrator in for a rebuild immediately
Q2. What does the Auto Lube system do?
Greases the cart wheels on a schedule
Oils the gun's static mixer before each shot
Automatically cycles lube through the auto calibrator (60 seconds every 10 minutes) so ISO can't crystallize
Q3. Which of these correctly states the PolyBadger's real-world limits?
28 lbs/min output and 400 feet of hose
About 6.2 lbs/min wide open, with 50–60 feet as the practical hose limit
Unlimited production as long as you increase the stick pump air pressure
Q4. Why do you replace the gun's black air hose with clear tubing?
Clear tubing is rated for higher pressure
So you can SEE foam blow back up the airline the moment a hole goes dead — and clear the gun before it sets up
Black hose isn't compatible with ISO
Q5. A contractor complains the machine's output is weak on a lifting job. What's the most common culprit?
The hose is 10 feet too long
The foam is expired
The flow switch is on LOW (insulation setting) — flipping it to HIGH triples the output
Saved — your progress is updated on the Training Hub.
← Equipment Masterclass: The Rig PolyShark Masterclass →